• Skip to main content
  • Skip to header right navigation
  • Skip to site footer
  • X
  • Facebook
  • YouTube
  • LinkedIn
Screen Connect
Support
Customer Portal
Pay Online
SWK logo.

SWK Technologies

Software Solutions & Services

  • Accounting & ERP Software
      • Acumatica Cloud ERP
        • Overview
        • Construction
        • Distribution
        • Field Service
        • Financial Management
        • Manufacturing
        • Professional Services
        • Project Accounting
        • Retail-Commerce
      • Sage Intacct
        • Overview
        • Construction and Real Estate (CRE)
        • Distribution Operations for Sage Intacct
        • Financial Services
        • Healthcare
        • Manufacturing Operations for Sage Intacct
        • Nonprofits
        • Professional Services
        • Sage Intacct Payroll powered by ADP
      • Sage 100
        • Overview
        • Business Intelligence
        • Core Accounting & Financials
        • Distribution
        • Manufacturing
        • Payroll
        • Sage 100 Contractor
      • More Accounting Products
        • QuickBooks
        • Sage 50
        • Sage 300
        • Sage 500
        • Sage BusinessWorks
      • ERP Add-ons
        • ADP Workforce Now
        • Altec
        • Avalara
        • AvidXchange
        • BigCommerce
        • CIMCloud
        • Cloud Hosting
        • DataSelf
        • Fortis
        • FreightPOP
        • Lumber
        • Microsoft 365
        • Netstock
        • Ottimate
        • Quadient
        • Sage Fixed Assets
        • Sage HRMS
        • Sage Intacct Payroll powered by ADP
        • Savant WMS
        • Scanco
        • ScanForce
        • Solver
        • SPS Commerce
        • Velixo
        • Workforce Go!
      • More ERP Add-ons
        • Bizinsight
        • Concur
        • Crystal Reports
        • Fraxion
        • Fusion RMS
        • FYISoft
        • JobOps
        • KnowledgeSync
        • Lockstep Collect
        • Nectari
        • Pacejet
        • Planning Maestro
        • Sage CRM
        • Sage Intelligence
        • Sage Supply Chain Intelligence
        • Scissortail HCM
        • Service Pro
        • ShipStation
        • Shopify
        • Starship
        • Sugar CRM
        • Time & Billing Pro
        • Timekeeper
        • True Sky
      • Industries
        • Construction
        • Distribution
        • Financial Services
        • Healthcare
        • Manufacturing
        • Nonprofit
        • Professional Services
        • Retail
  • Managed Cloud Services
      • Managed Services
        • IT Support
        • Cloud Hosting
        • Infrastructure-as-a-Service
        • Managed Cloud Services
        • vCIO
        • Acumatica Infrastructure
      • IT Solutions
        • Backup & Continuity
        • Cybersecurity
        • Email Hosting
        • Microsoft 365 Services
        • Virtualization
      • Industries
        • Financial Services
        • Healthcare
  • Consulting & Implementation
    • Business Technology Consulting
    • eCommerce
    • Financing
    • Human Capital Management
    • Managed Cloud & IT Services
    • Partner Program
    • Software Development
    • Software Implementation
  • Resources
    • Help Desk
    • Blog Posts
    • Payments Portal
    • Webinars
    • YouTube Channels
    • Acumatica Resources
    • Sage Intacct Resources
    • Sage 100 Resources
    • IT Resource Pages
  • About
    • About SWK
    • Awards & Recognition
    • Life@SWK
    • Careers
    • Success Stories
    • SWK Gives
  • Contact
    • Contact Us
    • Support
    • Our Locations

How to Create Custom Lookups Using Sage 100 ALE

August 28, 2025 by Hector

Home » Sage 100 » How to Create Custom Lookups Using Sage 100 ALE

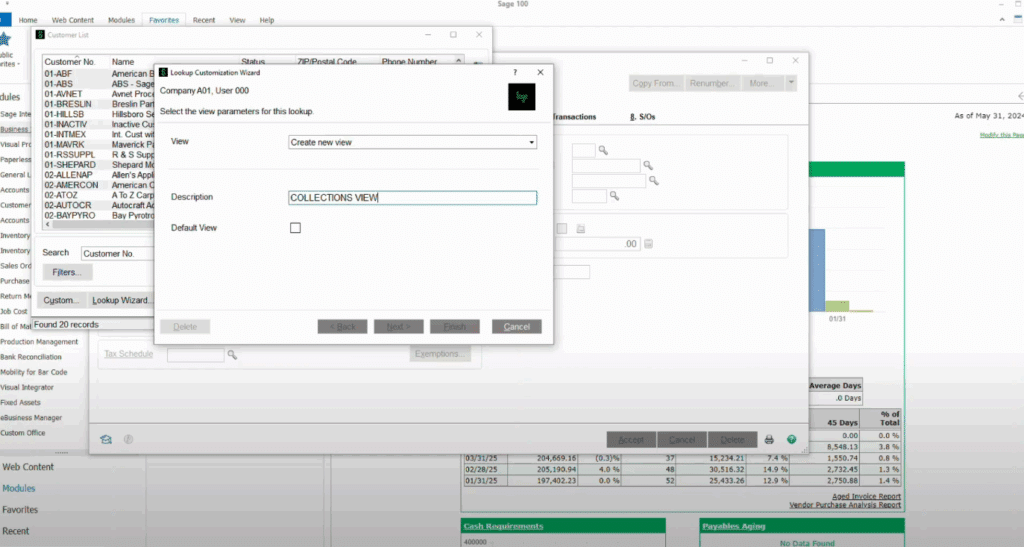
Screenshot of Sage 100 software interface showing the Lookup Customization Wizard dialog box with "COLLECTIONS VIEW" entered in the Description field, customer list visible in background, and dashboard charts on the right side of the screen.

The Advanced Lookup Engine (ALE) in Sage 100 lets you create customized views to quickly find, organize and manage different data sets and fields in your ERP. Using an example involving a collections workflow, this walkthrough builds upon this video demo by SWK Technologies and gives you a step-by-step guide to using the ALE for custom lookups in your Sage accounting software:

Accessing the Advanced Lookup Engine

  1. Navigate to Library Master Main in Sage 100
  2. Access the User Lookup Wizard for multi-user customizations
  3. Locate the magnifying glass icon throughout Sage 100 interface
  4. Click the Custom button to begin creating a new view

Creating a Custom Lookup View

Setting Up the Base View

  1. Click the Custom button from any standard lookup screen
  2. Name the new view (example: “Collections View”)
  3. Select the option to make this the default view
  4. The working screen displays:
    • Available fields on the left side
    • Selected fields on the right side
    • Default stock fields pre-loaded

Removing Unnecessary Fields

  1. Identify fields not needed for the specific purpose
  2. Select unwanted fields from the Selected Fields column
  3. Use the single arrow button to remove individual fields
  4. Use double arrows to move all fields at once
  5. Common removals for collections view:
    • Status field
    • ZIP code
    • Sort field

Adding Required Fields

Select appropriate fields from the Available Fields list and move to Selected Fields:

Customer Information Fields:

  • State (for timezone determination)
  • Email address
  • Customer phone numbers

Payment History Fields:

  • Date of last payment
  • Average days to payment of invoice
  • Average days overdue
  • Credit limit

Balance Information:

  • Current balance
  • Four aging categories (30, 60, 90, 120+ days)

Working with Linked Tables

  1. Expand linked table sections in Available Fields
  2. Select relevant fields from related tables
  3. Example: Add salesperson name from the salesperson table

Field Customization

Reordering Fields

  1. Select fields in the Selected Fields column
  2. Use up/down arrows to adjust field order
  3. Position frequently used fields for optimal workflow

Field Properties

Access field properties to customize display:

Width Adjustments:

  • Email address: Reduce to 20 characters
  • Date fields: Set to 10 characters
  • Numeric fields: Adjust based on expected data length

Column Headers:

  • Rename “Date of Last Payment” to “Last Paid”
  • Shorten “Average Days to Payment of Invoice” to “Avg Days”
  • Update aging categories with descriptive labels:
    • “30 Days Past Due”
    • “60 Days Past Due”
    • “90 Days Past Due”
    • “120+ Days Past Due”

Salesperson Field:

  • Remove table reference text
  • Simplify to “Salesperson”
  • Set appropriate character width

Creating Custom Calculations

Adding a Past Due Amount Field

  1. Click New Field to create a calculation
  2. Set field width (example: 12 characters)
  3. Access the Calculation Box using the hammer and wrench icon
  4. Build the formula by adding aging category fields
  5. Formula example: Sum of all aging categories except current balance
  6. Position the calculated field appropriately in the field order

Setting Up Filters and Search Criteria

Filter Configuration

  1. Navigate to the Filter step in the wizard
  2. Add filter conditions based on business requirements
  3. Example filter: Past Due Amount greater than $0.01
  4. Multiple filters can be applied as needed

Default Search Settings

  1. Configure the default search criteria
  2. Change from exact match to “contains”
  3. Set search field to customer name for easier lookups
  4. Complete the wizard setup

Using the Custom Lookup

View and Sort Data

  1. The customized lookup displays all configured fields
  2. Sort by any column by clicking the header
  3. Common sorting options:
    • Past due amount (highest to lowest)
    • Salesperson (for territory management)
    • Customer name (alphabetical)

Export to Excel

  1. All advanced lookups include Excel export capability
  2. Click the Excel export button
  3. Data exports with all visible columns and current sort order
  4. Use Excel for additional analysis:
    • Insert subtotals by salesperson
    • Create follow-up lists for sales teams
    • Generate collection reports

Best Practices for Sage 100 Lookups

Collections Management

  • Filter for accounts with past due balances
  • Sort by amount or aging to prioritize follow-up
  • Include contact information for efficient outreach
  • Export data for sales team distribution

Performance

  • Limit field selections to necessary data
  • Use appropriate field widths to optimize display
  • Test filters to ensure accurate results
  • Save multiple views for different purposes

User Management

  • Create consistent views across user accounts
  • Document field selections and calculation formulas
  • Train users on custom view functionality
  • Regular review and updates as business needs change

Optimize Your Sage 100 Experience with the Experts

The award-winning team at SWK Technologies will help you get the most out of your ERP, and ensure your business captures the full value of your software investment by streamlining your productivity. Get in touch with our expert Sage 100 consultants today and see for yourself how we can empower your team to enable your business success.

Contact SWK here to learn more about how our consultants will leverage their Sage 100 expertise to help you transform your daily operations with your accounting and business management software.

Contact Us

Category: Sage 100, Blog, Tips and Tricks, Training

Sidebar

Recent Posts

  • How to Create Custom Lookups Using Sage 100 ALE
  • SWK Cybersecurity News Recap August 2025
  • Purchase Use Tax in Sage Intacct
  • A Lesson in How the Right IT Support Can Transform a School
  • How Managed Services Address the Healthcare IT Talent Shortage
  • SWK Technologies Named to CRN’s Fast Growth 150 List for 2025
  • 5 Signs You are Outgrowing Sage 100 On-premise in Manufacturing

Categories

Ready to take the next step?

Contact SWK today to get in touch with one of our experts. We’ll go over your business challenges and unique needs, and see where you can unlock new value from your technology and make your operations run easier.

Get in touch!

Our Latest Posts

Screenshot of Sage 100 software interface showing the Lookup Customization Wizard dialog box with "COLLECTIONS VIEW" entered in the Description field, customer list visible in background, and dashboard charts on the right side of the screen.

How to Create Custom Lookups Using Sage 100 ALE

Read moreHow to Create Custom Lookups Using Sage 100 ALE
Wooden letter blocks spelling "AUGUST 2025" arranged on neutral background for SWK's cybersecurity news recap article.

SWK Cybersecurity News Recap August 2025

Read moreSWK Cybersecurity News Recap August 2025
Sage Intacct Tax Detail Information form showing CA Use Tax Liability configuration with -7.00 percent rate, GL account 23000 - Use Tax Payable, and Active status.

Purchase Use Tax in Sage Intacct

Read morePurchase Use Tax in Sage Intacct

Awards and Accreditations

Top work places in NJ 2020.
Acumatica the Cloud ERP gold certified partner.
The Gold Microsoft partner logo on a black background.
Sage business partner diamond logo.
Dell Technologies Gold Partner
Sage tech partner logo.

Stay in the know!

Subscribe for exclusive ERP, process automation, IT and cybersecurity news.

Twitter
  • Facebook
  • YouTube
  • LinkedIn

Home
About
Contact

Support
Screen Connect
Pay Online
Downloads

SWK logo.

Headquarters:
120 Eagle Rock Ave, Suite 330
East Hanover, NJ 07936

Contact:
info@swktech.com
(877) 979-5462

Copyright © 2025 · SWK Technologies, Inc. · All Rights Reserved · Terms of Use · Privacy Policy

This site uses cookies to collect information about your browsing activities in order to provide you with more relevant content and promotional materials, and help us understand your interests and enhance the site. By continuing to browse this site you agree to the use of cookies. Visit our privacy policy to learn more.