The Advanced Lookup Engine (ALE) in Sage 100 lets you create customized views to quickly find, organize and manage different data sets and fields in your ERP. Using an example involving a collections workflow, this walkthrough builds upon this video demo by SWK Technologies and gives you a step-by-step guide to using the ALE for custom lookups in your Sage accounting software:
Accessing the Advanced Lookup Engine
- Navigate to Library Master Main in Sage 100
- Access the User Lookup Wizard for multi-user customizations
- Locate the magnifying glass icon throughout Sage 100 interface
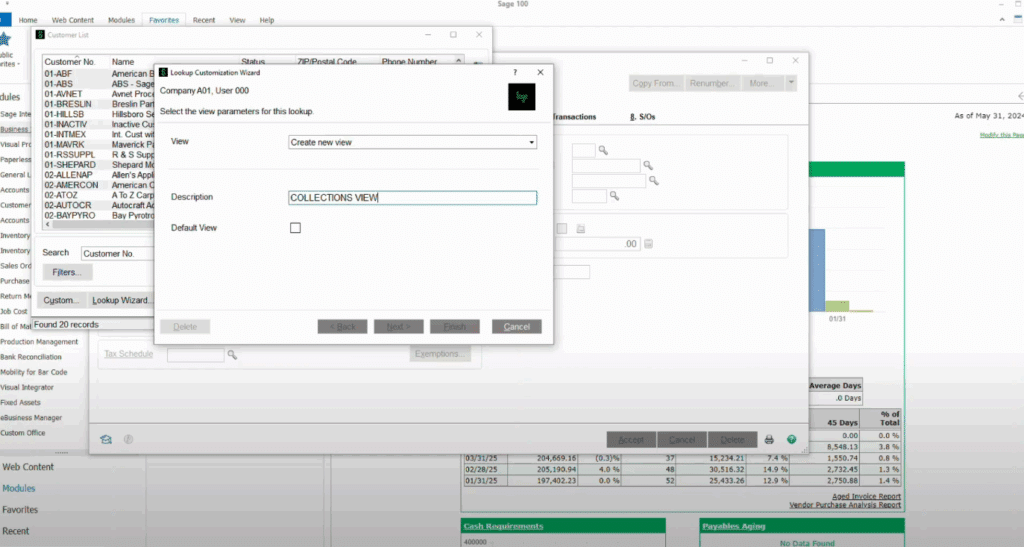
- Click the Custom button to begin creating a new view
Creating a Custom Lookup View
Setting Up the Base View
- Click the Custom button from any standard lookup screen
- Name the new view (example: “Collections View”)
- Select the option to make this the default view
- The working screen displays:
- Available fields on the left side
- Selected fields on the right side
- Default stock fields pre-loaded
Removing Unnecessary Fields
- Identify fields not needed for the specific purpose
- Select unwanted fields from the Selected Fields column
- Use the single arrow button to remove individual fields
- Use double arrows to move all fields at once
- Common removals for collections view:
- Status field
- ZIP code
- Sort field
Adding Required Fields
Select appropriate fields from the Available Fields list and move to Selected Fields:
Customer Information Fields:
- State (for timezone determination)
- Email address
- Customer phone numbers
Payment History Fields:
- Date of last payment
- Average days to payment of invoice
- Average days overdue
- Credit limit
Balance Information:
- Current balance
- Four aging categories (30, 60, 90, 120+ days)
Working with Linked Tables
- Expand linked table sections in Available Fields
- Select relevant fields from related tables
- Example: Add salesperson name from the salesperson table
Field Customization
Reordering Fields
- Select fields in the Selected Fields column
- Use up/down arrows to adjust field order
- Position frequently used fields for optimal workflow
Field Properties
Access field properties to customize display:
Width Adjustments:
- Email address: Reduce to 20 characters
- Date fields: Set to 10 characters
- Numeric fields: Adjust based on expected data length
Column Headers:
- Rename “Date of Last Payment” to “Last Paid”
- Shorten “Average Days to Payment of Invoice” to “Avg Days”
- Update aging categories with descriptive labels:
- “30 Days Past Due”
- “60 Days Past Due”
- “90 Days Past Due”
- “120+ Days Past Due”
Salesperson Field:
- Remove table reference text
- Simplify to “Salesperson”
- Set appropriate character width
Creating Custom Calculations
Adding a Past Due Amount Field
- Click New Field to create a calculation
- Set field width (example: 12 characters)
- Access the Calculation Box using the hammer and wrench icon
- Build the formula by adding aging category fields
- Formula example: Sum of all aging categories except current balance
- Position the calculated field appropriately in the field order
Setting Up Filters and Search Criteria
Filter Configuration
- Navigate to the Filter step in the wizard
- Add filter conditions based on business requirements
- Example filter: Past Due Amount greater than $0.01
- Multiple filters can be applied as needed
Default Search Settings
- Configure the default search criteria
- Change from exact match to “contains”
- Set search field to customer name for easier lookups
- Complete the wizard setup
Using the Custom Lookup
View and Sort Data
- The customized lookup displays all configured fields
- Sort by any column by clicking the header
- Common sorting options:
- Past due amount (highest to lowest)
- Salesperson (for territory management)
- Customer name (alphabetical)
Export to Excel
- All advanced lookups include Excel export capability
- Click the Excel export button
- Data exports with all visible columns and current sort order
- Use Excel for additional analysis:
- Insert subtotals by salesperson
- Create follow-up lists for sales teams
- Generate collection reports
Best Practices for Sage 100 Lookups
Collections Management
- Filter for accounts with past due balances
- Sort by amount or aging to prioritize follow-up
- Include contact information for efficient outreach
- Export data for sales team distribution
Performance
- Limit field selections to necessary data
- Use appropriate field widths to optimize display
- Test filters to ensure accurate results
- Save multiple views for different purposes
User Management
- Create consistent views across user accounts
- Document field selections and calculation formulas
- Train users on custom view functionality
- Regular review and updates as business needs change
Optimize Your Sage 100 Experience with the Experts
The award-winning team at SWK Technologies will help you get the most out of your ERP, and ensure your business captures the full value of your software investment by streamlining your productivity. Get in touch with our expert Sage 100 consultants today and see for yourself how we can empower your team to enable your business success.
Contact SWK here to learn more about how our consultants will leverage their Sage 100 expertise to help you transform your daily operations with your accounting and business management software.