Acumatica 2025 R2 introduced the AI Studio, a built-in feature that connects an external large language model (LLM) directly to your ERP. The goal is straightforward: reduce the time employees spend on repetitive data entry by generating content — descriptions, notes, reports — from within the system itself, without switching between applications or requiring separate logins.
Taken from training provided by the SWK Technologies Acumatica consulting team, this walkthrough shows you how to set up this functionality and covers everything from the initial LLM connection to a live prompt generating stock item descriptions. Here is a breakdown of how it works:
What is Acumatica AI Studio?
AI Studio is a no-code framework that lets users connect a large language model to specific Acumatica screens and trigger AI-generated field updates from an action button — without leaving the ERP or requiring separate logins. It focuses on field-level actions within a single document — for example, updating a case, sales order or stock item record — not on creating new records or running cross-document jobs in the background.
Within your ERP, AI Studio works by communicating through the Acumatica Secure Cloud, a proxy server that forwards the prompt to the selected LLM provider. In 2025 R2, it is currently available at no additional cost as an Experimental Feature for customers on the Acumatica Modern UI version with Select, Prime or Enterprise licensing, with a full release planned for 2026 R1.
Instead of copying data out to a separate artificial intelligence tool and pasting results back in, you can:
- Call an LLM from within Acumatica
- Point it at specific screens and fields
- Use natural‑language instructions to generate descriptions, notes or other text
- Run that automation from a button on the forms your team already uses every day
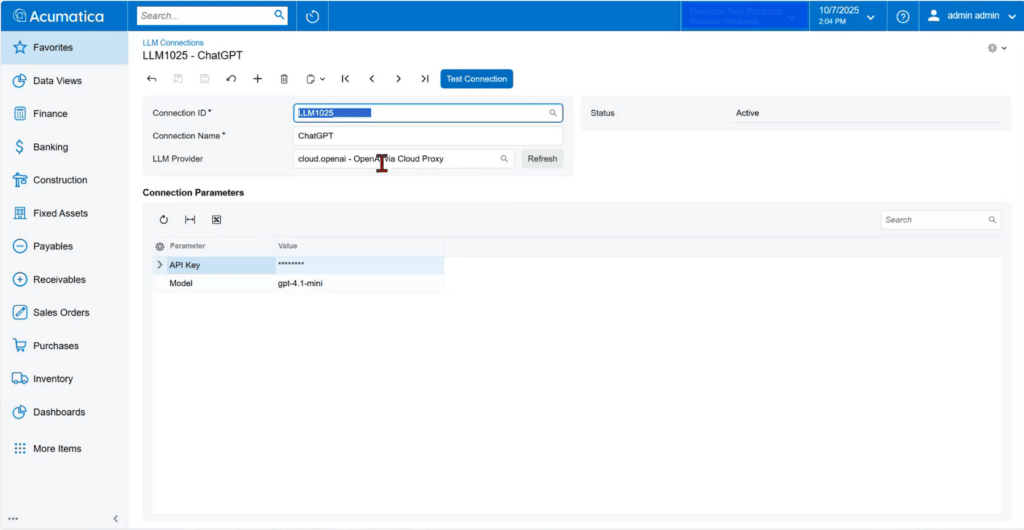
Step 1: Set Up an LLM Connection
The first stop in Acumatica AI Studio is the LLM Connections page. This is where your company can link to your preferred AI provider to your specific instance of your cloud ERP. Acumatica 2025 R2 currently supports several provider options:
- OpenAI (via Cloud Proxy, for ChatGPT)
- Anthropic (Claude)
- AWS
- Azure
To create a connection, users assign a Connection ID and name, then select their provider. From there, the only technical requirement is an API key from the LLM provider’s dashboard. That key tells the system which account and organization the connection belongs to.
Once the API key is entered, users select the specific model they want to use. Different models vary in processing speed and output depth — OpenAI’s GPT-4.1 mini, for example, runs faster on simpler tasks than GPT-5 and may be a better fit for high-volume, straightforward requests like short product descriptions. This is also dependent on the complexity the prompts involved, which is something to keep in mind when working with various versions of the different LLMs available on the market currently.
After saving the configuration, a Test Connection button confirms whether the setup was completed correctly. The process takes a few seconds and returns an operation status.
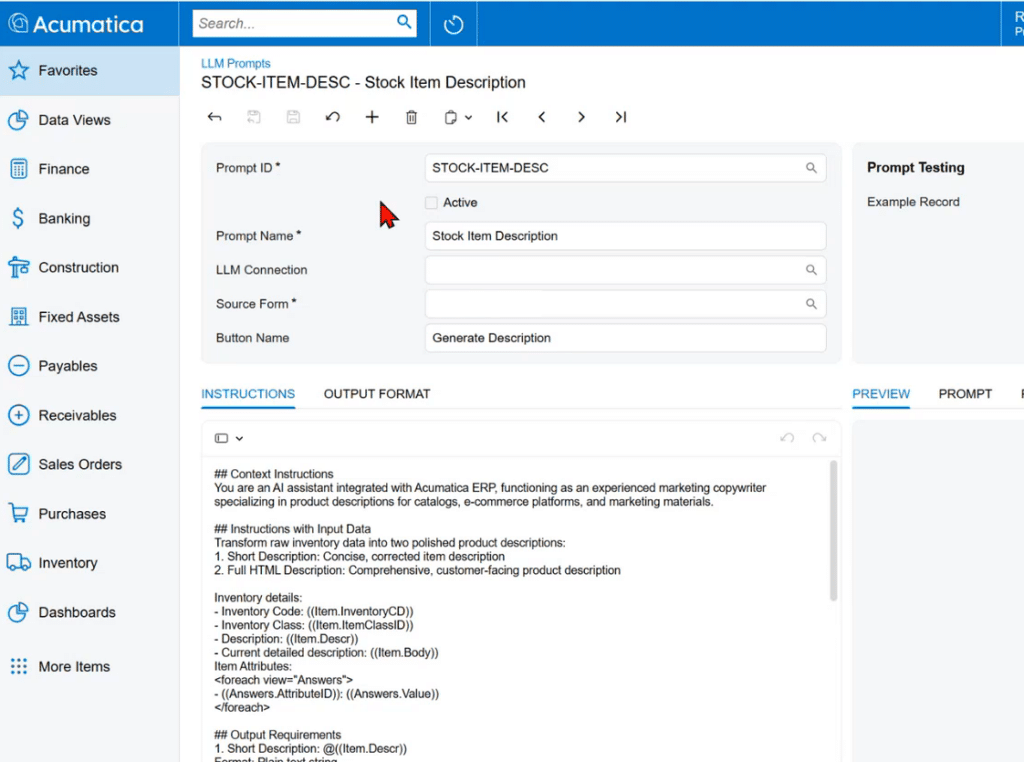
Step 2: Create an LLM Prompt
With the connection active, the next step is the LLM Prompts page. This is where users define what the AI should do and where it should appear within Acumatica.
Each prompt record includes:
- Prompt ID and Name — a unique identifier and a descriptive label
- LLM Connection — ties the prompt to the active connection created in Step 1
- Source Form — the specific Acumatica screen where the prompt will appear (selected by Screen ID)
- Button Name — the label that will display on that screen to trigger the prompt
The Instructions tab is where the actual prompt content lives. Users write plain-text instructions telling the LLM what to generate and how to format it — no coding required. For a stock item description, for example, instructions might specify: generate a short, plain-text description of no more than 50 characters, correcting any grammar or spelling errors, and focusing on relevant product details.
Step 3: Define the Output Format
The Output Format tab defines where in the form the generated content should appear. In the stock item example, the output maps directly to the item description field on the Description tab.
Before activating a prompt, the Prompt Testing panel on the right side of the screen lets users select any existing record, run the prompt against it and preview the output before it goes live:
- Pick an Example Record from your stock items.
- Run Test Prompt to see a preview of the description the LLM will generate.
- Review the output — does it follow your length, formatting and tone guidelines? If not, adjust the instructions and test again.
Step 4: Activate and Use the Prompt
Once instructions and output format are confirmed, checking the Active box publishes the prompt to the selected form. After saving, a new button appears on that screen — in the stock item example, a “Generate Description” button becomes available in the toolbar.
Users can also star the action so it appears as a persistent button on every record in that form via the Favorites functionality in Acumatica. From there, the workflow is simple: open any stock item, click the button and wait a few seconds for the LLM to read the record’s existing data and return a generated description.
The demo showed this working across very different item types — a laptop computer, a LEGO set, an injection molding machine — with each output pulling from the actual inventory data tied to that record.
Where You Can Take Acumatica AI Studio Next
The same pattern used for stock item descriptions can support many other scenarios:
- Generating consistent closure notes for support cases.
- Summarizing project budget variance details.
- Refining email or portal replies before they go out to customers.
- Drafting internal notes based on structured data already in Acumatica.
As Acumatica continues to expand AI Studio, these building blocks will make it easier to automate more of the repetitive text your team handles every day. The current product roadmap lists additional being launched use cases over time – including richer transaction summaries, reusable document templates and AI‑assisted anomaly detection – building on the same low‑code, bring‑your‑own‑LLM foundation.
Learn More About Acumatica AI with SWK Technologies
As a top Acumatica partner and Community resource, SWK Technologies brings significant technological and industry knowledge to help you get the most out your ERP investment, including in the emerging artificial intelligence features being rolled out. Get in touch with our team of experts today to learn more about AI Studio and other LLM functions within Acumatica, and how your business can leverage these to streamline your software usage.
Contact SWK here to discover all of the generative AI features available in Acumatica and emerging in the future.