This article has been updated as of November 4, 2024.
George Wirtjes
Senior Consultant – Sage 100
SWK Technologies, Inc.
This video describes how to configure OAuth for user authentication with Microsoft 365 and Office 365 accounts, as well as adding the required information to your Sage 100 SMTP settings.
NOTE: Effective October 1, 2022, Microsoft made changes to Microsoft Exchange that will impact your ability to email in-product if you are on Sage 100 2020 or older. Microsoft has deprecated TLS 1.1, which is used in older versions as part of the Paperless Office email function. Microsoft 365 will also require OAuth for authentication.
If you are using Sage 100 2021.4 or higher, a supported OAuth configuration is available but will need to be configured. If you are not using Sage 100 2021.4 or newer, please reach out to your SWK CAM or contact us at info@swktech.com.
Watch the video or read the transcript below to learn more about setting up OAuth in Sage 100 for Microsoft 365:
How to Configure Sage 100 OAuth for Microsoft 365
In this video, you will learn how to configure OAuth authentication for Microsoft 365. This will allow you to use your Sage 100 ERP to send and receive emails from the application.
Initial Setup Steps
Before beginning the configuration process, ensure you have:
- Administrative access to Microsoft 365
- Sage 100 version 2021.4 or higher
- A text editor for storing configuration values
First, navigate to the Exchange Admin Center at admin.exchange.microsoft.com. In this example, I’m going to use an existing email account. You should be familiar with how to set that up. I’m going to click on the email account that I wish to use and check its delegation. Under “Reading manage full access,” I want to make sure that the appropriate users have rights to that mailbox. In my example, they do. If you need to add members, you can do so by clicking the “Add members” button, then close the screen.
Exchange Admin Center Configuration
- Navigate to admin.exchange.microsoft.com
- Select your target email account
- Verify delegation permissions:
- Check “Reading manage full access” settings
- Confirm appropriate user rights
- Add additional members if needed
Azure Portal Configuration
Next, we will log into the Microsoft Azure portal. In this portal, we will type in “app registration.” We will then click on “New registration” and give it a name. In this example, I’m going to use “SMTP Sage 100.” For supported account types, we’ll leave it at Single tenant, and the redirect URI should be “public client native.” Then click “Register.”
- Access the Azure portal
- Search for “app registration”
- Create new registration:
- Name: “SMTP Sage 100” (recommended)
- Account type: Single tenant
- Redirect URI: public client native
Required Configuration Values
From here, we’ll want to continue to authentication. It is a good idea to have a text document open so that you can copy these keys into that text document for easy access later. In this example, I’m going to copy the client ID over and paste it.
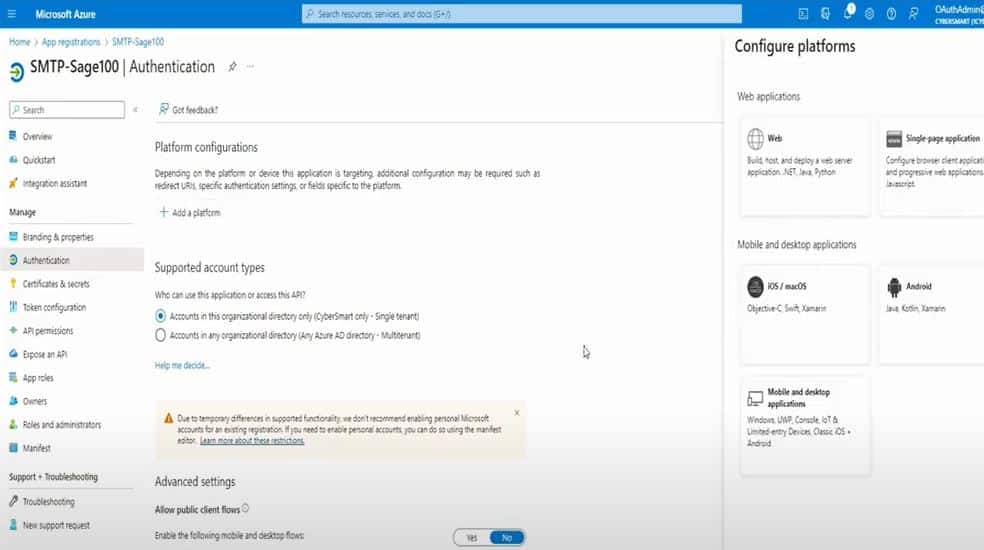
Now I’m going to click on “Authentication,” then “Add a platform.” I’m going to click on “Web application” and enter the redirect URI. In our example, it should just be “https://localhost.” Then click “Configure.”
Once that’s done, we need to create a certificate. In this example, I will need to create a new client secret, and I’m just going to use the same name again: “SMTP Sage 100.” You also need to select expiration – it’s recommended that you do 6 to 12 months. Then click “Add.” You will want to take the client value (the secret ID) and copy it to that text document.
Permission Settings
Next, we will configure the permissions. Click on the left-hand side “API permissions” and add a permission for Microsoft Graph. Click on “Delegated permissions” and enter the delegated permissions you wish to add. In this example, I’m going to use:
- SMTP
- POP
- IMAP
- Offline Access
Select each permission and click “Add permissions.” You should see all your permissions listed. The only one you don’t really need here is “user read,” so you can remove that.
Add Permissions in Microsoft Graph
- Under “API Permissions,” select “Microsoft Graph,” then “Delegated Permissions”
- Add the following permissions:
- SMTP.Send for email sending
- POP and IMAP for receiving protocols
- Offline Access for token management
- Remove User.Read if unnecessary
With that information, you should be able to gather what you need to set up your Sage 100 account with the appropriate permissions and certificates.
Sage 100 Configuration
Now I’m going to copy the endpoints to get the token ID endpoint, the authorization endpoint, and the token endpoint – you can just click “Copy to clipboard.”
I’ll also need the tenant ID (directory/tenant ID) and the object ID. With these settings, you should be able to configure your Sage 100 app to send and receive email via your Microsoft 365 account. It is very important that you know the password of the Microsoft 365 account that you’re going to be setting up.
To configure Sage 100 for OAuth:
- Open your Sage 100 app
- Go to Company Maintenance
- Select the company you wish to set up the account for
- Click on “Email”
- Select “OAuth” from the dropdown
- Enter “smtp.office365.com” as the address
- Set SMTP encryption to TLS
- Copy in the associated information from your text document:
- Client ID
- Client Secret
- Authorization endpoint
- Token endpoint
The scope should always be: “https://outlook.office.com/SMTP.Send offline_access” The redirect URI should be: “https://localhost“
Click “Accept” and save the information, then test it. Use the email account address that you used to set it up. You’ll be prompted to log in – this only needs to be done once for the duration you set in Azure (in my case, 12 months).
If you get into a situation where you don’t have the right password, you can always go back to your mailbox at portal.office.com, click on the email address, and click “Reset password.” A new password will be generated, and when you try to log in, it will prompt you to change the password.
Once you sign in, it should authorize the application and connect. You should see a popup in your Outlook box confirming that the test email was sent. Once you verify the email was received, you know that the configuration is correct and working. Now your clients can try emailing from paperless office.
Testing and Troubleshooting:
- Send a test email from the Sage 100 email settings screen
- If prompted, log in with Microsoft credentials (valid for the set duration, e.g., 12 months)
- If password issues arise, reset it via portal.office.com under “Reset Password”
For more detailed information please see this Microsoft documentation
Get More Support for Sage 100 and OAuth
While this guide covers the basic setup process for OAuth authentication in Sage 100, your business may have unique requirements or face specific challenges during implementation. The Sage 100 consulting team at SWK Technologies specializes in helping businesses optimize their ERP configuration and ensuring that you get the most out of your software investment.
Contact SWK here and get in touch with our Sage experts to ensure your OAuth implementation aligns with your business needs and Microsoft 365 requirements.